Time for an overhaul of my 1.9 '98 BMW Z3 Individual

I've never needed more than a hammer and BUS to get the inner races off. New backplates are always a good idea as well as hammering out the ABS sensors, cleaning out the holes with a rotary file and fitting new ones with copper grease. I give new steel backplates a rub down and a few extra coats of satin black. Do it all now and it'll never be an issue again. Dead ABS sensors will fall out on command.

Those struts are original BMW factory fit. Sachs so probably okay. Take the springs off and fit new bump stops and plastic tubes.
 
thanks mate..appreciate that...yeah lessons,learnt I was trying to be delicate before I resorted to a hammer and chisel..I have all new accessories. Only the hub itself is remaining...

good idea about the struts, missed that bit... I'd need to get some spring compressors. My plan was to "get the thing back on 4 wheels" and maybe do the bump stops next year..... but I guess its a case of , while they're of and all that
 
Last edited:
Only going to get one day this weekend, but !... I'm off all next week so we'll see what happens then...

First up was painting the hubs with Kurust. I know I probably didn't need to, but hey

1758379030231.png
1758379071100.png


rubbed down both struts, got the Dremel sanding drums onto the small areas of corrosion, as these struts are in really good nick

1758380046072.webp
1758379158263.png
1758379189471.png


so while they were baking, I decided to attack the offside front brake caliper.....think I now have an unhealthy obsession with getting rid of rust..... grinding this down took a couple of hours !!!! once you account for all the nooks and crannies. Then painted with Kurust.

Once done I'll use the same silver spray I used on the rears. I also have the Big Redd overhaul kit on standby.

1758379285581.png
1758379317995.png
1758379419922.png


So while that was all going on, the hubs had dried and ready for the enamel paint. I'll take off the paint on the mating surfaces with the Dremel as I reckon that'll be quicker than masking everything up.

1758379544432.png
1758379566492.png
1758379633077.png


So the next stages are. : Spray the shocks with the black gloss enamel, paint and rebuild the calipers. Then I'll have no excuse to not start building the suspension back up.

oooo almost forgot, also got to repaint the anti-roll bar and............. drum roll...... zinc plate all the bolts. THEN.. I can rebuild it.
 
Yes it's a Monday... but.. I have the week off. However I will NOT be in garage every day, although I can see the finish post..... about 50 miles in the distance :whistle: =))

Today I wanted to get the shocks painted, calipers painted and anti roll bar painted.........let me show how the day panned out....

so... starting with the shocks.... paint went on very well... looks nice and even... might have gone little overkill on the masking but I didn't want any overspray. Yes call me weird, but I wanted to protect the Sachs label


1758553901431.webp
1758553924400.webp
1758553949612.webp


and this is how they came out...

1758554017191.webp
1758554038029.webp
1758554065320.webp


Then I turned onto the offside front caliper....... piston completely seized in. I tried the footpump trick, no beuno...

Then saw a trick on Youtube about jamming in sockets and Allen keys, so that an Allen key uses the others as a lever

and I actually managed to get it to move !!... I'd say about 10 degrees

1758554219863.webp


flush with my new found skills i tried again and bang...

1758554292800.webp


Now in theory I can still try the same technique.... but I guess in reality, I'm looking at a new caliper for the offside :whistle:

So I abandoned that for now... and focussed on the anti roll bar. Took it back to bare metal using the carbide polyester wheels on the angle grinder....and just because I could, noted the part number

1758554418028.webp
1758554442099.webp
1758554464913.webp


given that the curves were a bit pitted I decided to paint the whole thing with kurust and it immediately turned black.. I'll let that dry for a couple of days and then hit that with the VHT black gloss paint I used on the shocks...

1758554676428.webp


but for tomorrow... we're of to Clarkson's Farmer's Dog pub... if we can get in ! so a day or two in Oxford
 
If you can’t get in pop into the Marlestone Tavern in Milton near adderbury, Banbury. Top notch pie pub and it’ll be the best meal you can have for less than £20 if you have an appetite. Plus I’ll show you my ///M but I don’t think your other half would be impressed at that.

Can you get any grips on that piston to twist it but I suppose the bore knackered.
thanks for the offer mate but I think tomorrow is a Z3 free day!... I'd love to come up and see it another time though...I might try grips especially seeing genuine BMW calipers are over 100 quid..yet pattern ones are about 30 quid. Stupid pride in me is to restore over replace...so I'll have another go at getting that piston out...
 
I’ve got some oem bmw calipers in need of refurb if you want them mate ..in fact about to have two sets as the left front on my 3.0 got a bit sticky so swapping those out for some new ones.
IMG_0362.jpeg

IMG_0363.jpeg
 
Last edited:
Seeing the Fiji is reason enough. Let me know when you are free. Any evening this week any good?
 
Apologies for chiming in here but be aware that 6cyl calipers aren’t a direct drop in replacement for 4cyl calipers (if you weren’t already aware).
 
bit out of kilter having the week off, hence I'm in the garage on a Friday !!

first off, big thanks to @AntStark for taking the time to pop to mine yesterday and bring the brake calipers and also see the Fiji legend in the flesh !!...... they'll certainly get the "Portchester treatment" !

1758893370297.webp


The main focus of today was to firstly finish the anti roll bar... can't believe how well that paint looks..to touch it, it feels like it's been powder coated..

1758893470785.webp
1758893488732.webp
1758893992368.webp


so I can thoroughly recommend this paint. it's what I used on the shocks as well, goes on super smooth

Next up was mindless grinding down, getting the rust off the anti roll bar brackets an the shock and caliper bolts getting them clean enough for zinc plating. The brackets took over an hour to the point I got (against my beliefs) to ... "that's going to have to do".....

1758893759607.webp

1758893797843.webp


They'll get another quick go over before I actually plate them but hopefully not as time intensive as today ! Everything brown you see, will not plate and will come out black. That's why for perfect plating, you have to be clinical.
 
like a mad man I decided to grind down some more fixings ready for zinc plating. It's definitely a patient persons past time, something I'm not usually accustomed to!

Wishbone drop link bracket up first....... first one came off fine.....confidence was high for the second one.... then...

1758983768903.webp


dammit !! :whistle: .... EEEEEEEEbaaaaaaaaaaaayy !!!..... so, two new ones on their way

if you ever get into zinc plating... this is what you have to go through..... every surface, every angle needs to be cleaned

1758984280070.webp
1758983935372.webp


These are the top bolts that holds the hub to the suspension strut. Zinc won't take to anything that's dirty. The shaft of the bolt will be fine but the pitted nut will come out dark.

I literally spent 3 hours doing all this, including the ABS sensor screws and the little grub screws that hold the caliper dust shield on, and the grub screws for the discs. There's two nuts in there that I'm going to replace because I had to get the off with nut extractors so they're pretty chewed.

1758984162611.webp


I will need to give them a quick go over before I plate, but hopefully not as much as I just have !!.... so in there are Strut mounting bolts; caliper bolts; lollipop bolts, ABS sensor screws, plate grub screws and disc grub screws.
 
well yesterday I returned to my zinc plating days...… All the fasteners I cleaned off before, I dumped in a tub of Evapo-rust. On the bottle it says to leave for 12 to 24 hours. I ended up leaving it all week, as it otherwise meant pouring it back and then cleaning it all off before plating

So after a week they all came out black

1759663397214.png


luckily the black came off easily enough on a brass wire wheel....

1759663481438.png


I couldn't get all the rust off the ARB bush brackets, more of that later!

Then it was onto the plating. Looks a major faff, but when you know what you're doing you can be up and running in 15 minutes...

1759663612472.png
1759663638384.png
1759663663661.png
1759663698252.png


Then you basically setup a mini production line. When one batch is "cooking", another batch is degreased and acid etched. Then hang it all out to dry !

1759663790538.png
1759663892086.png


The only real failure were the roll bar bush brackets.. due to the embedded rust, it just didn't work, so I've relented and ordered two new zinc plated ones

1759664565337.png


And this is the next morning.... yes, the strut bolts are in the wrong way round, as the mounting plate is cantered, they'd fall out otherwise ! =))

1759664027038.png


offered up the lollipop bolts to the new lollipops and laid out the caliper bolts and other fixings...even did the nuts for the front disc dust shield

1759664126596.png


So that's it for this weekend. Next weekend I'll try and refurbish the front calipers kindly given to me by @AntStark.

After that I need to clean the rust off the front subframe... I'll do it in situ as I don't want the faff of supporting the engine by taking it off. Then it's replacing the inner and outer tie rods.... then.... there's no excuse to not start putting stuff back on the car...
 

Attachments

  • 1759663828463.webp
    1759663828463.webp
    18.2 KB · Views: 411
Last edited:
Matt … you are officially the Dr Jekyll of the forum……=))=))=))=))
 
Not much this weekend as my number one priority was fixing the washing machine. Wouldn't drain and after dismantling the whole thing, turns out my only solution is to buy a new pump....... anyway, back to Z3s

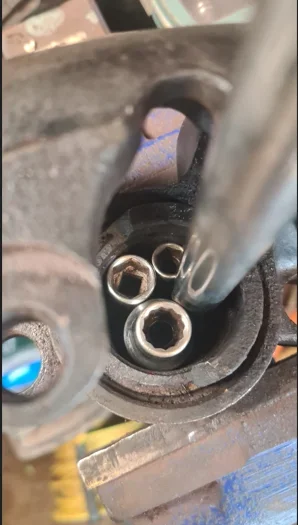
I set myself the mission today of finally removing the caliper piston.... I'd scoured YouTube and found one similar to jamming Allen wrenches in, (which I tried but snapped the top off the piston) but this one was by using sockets, an extension bar and a ratchet.

If you're sat comfortably..... I'll begin.....

you need to faff around getting the right combination. Mine was a 1/2" extension and a few sockets... put the sockets in first, then try and jam the extension bar in the gap. It needs to be really snug so that you can't spin it. Even a couple of love taps might help to really jam it in.

1760272525208.webp


Make sure your caliper is in a vice, you can't really hold it by hand, then attach your ratchet, and you're good to go ..

1760272561078.webp
1760272592212.webp


now it'll take a firm grip but, slowly start turning the ratchet and the piston will start to turn as well. spray some WD40 in the gaps of the piston wall and the turning will start to become easier...

Then, whilst you're still turning gently start to lift as well, not too much or you'll pull the bar out. Notice it's more exposed now.

1760272758020.webp


keep going and it'll eventually fall out....

1760272813340.webp
1760272829303.webp


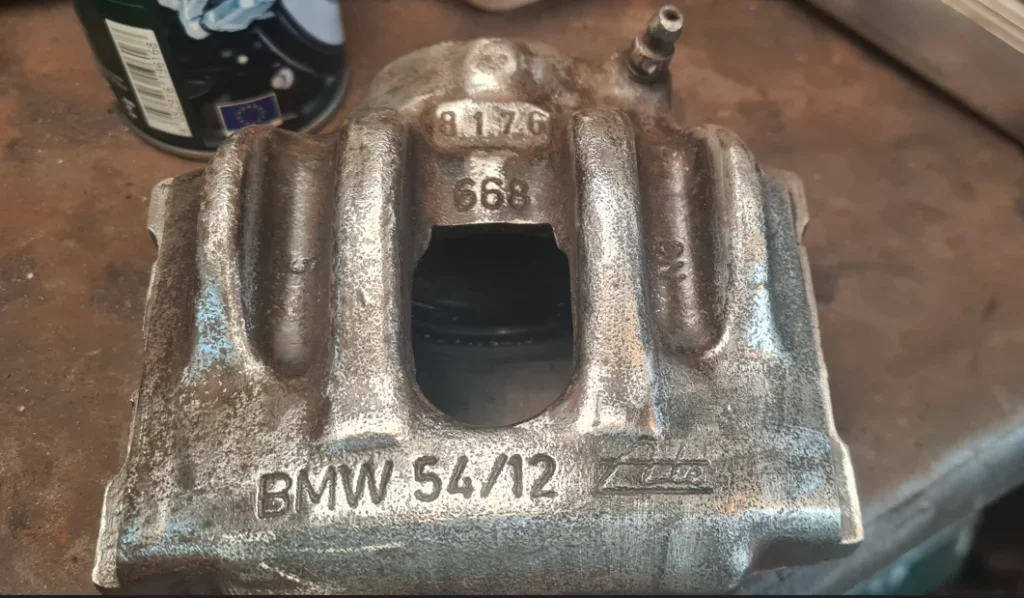
et voila !!!... this one will get binned due to the broken top.

1760272865897.webp


Then it's a case of cleaning up the caliper ready for paint, and the Bigg Red rebuild kit

1760273002694.webp


1760272975127.webp


right... back to washing machines... :whistle::whistle:
 

Attachments

  • 1760272509851.webp
    1760272509851.webp
    20.7 KB · Views: 413
  • 1760272949998.webp
    1760272949998.webp
    93.6 KB · Views: 478
Back
Top